In the #EraofIsolation we are all getting accustomed to digital greetings and virtual meetings, and with the new norm has come a new standard of what’s acceptable for those video presentations. As you stay safe and work from home, we have a few tips for how to look good on camera even when filming from home.
Check your setup
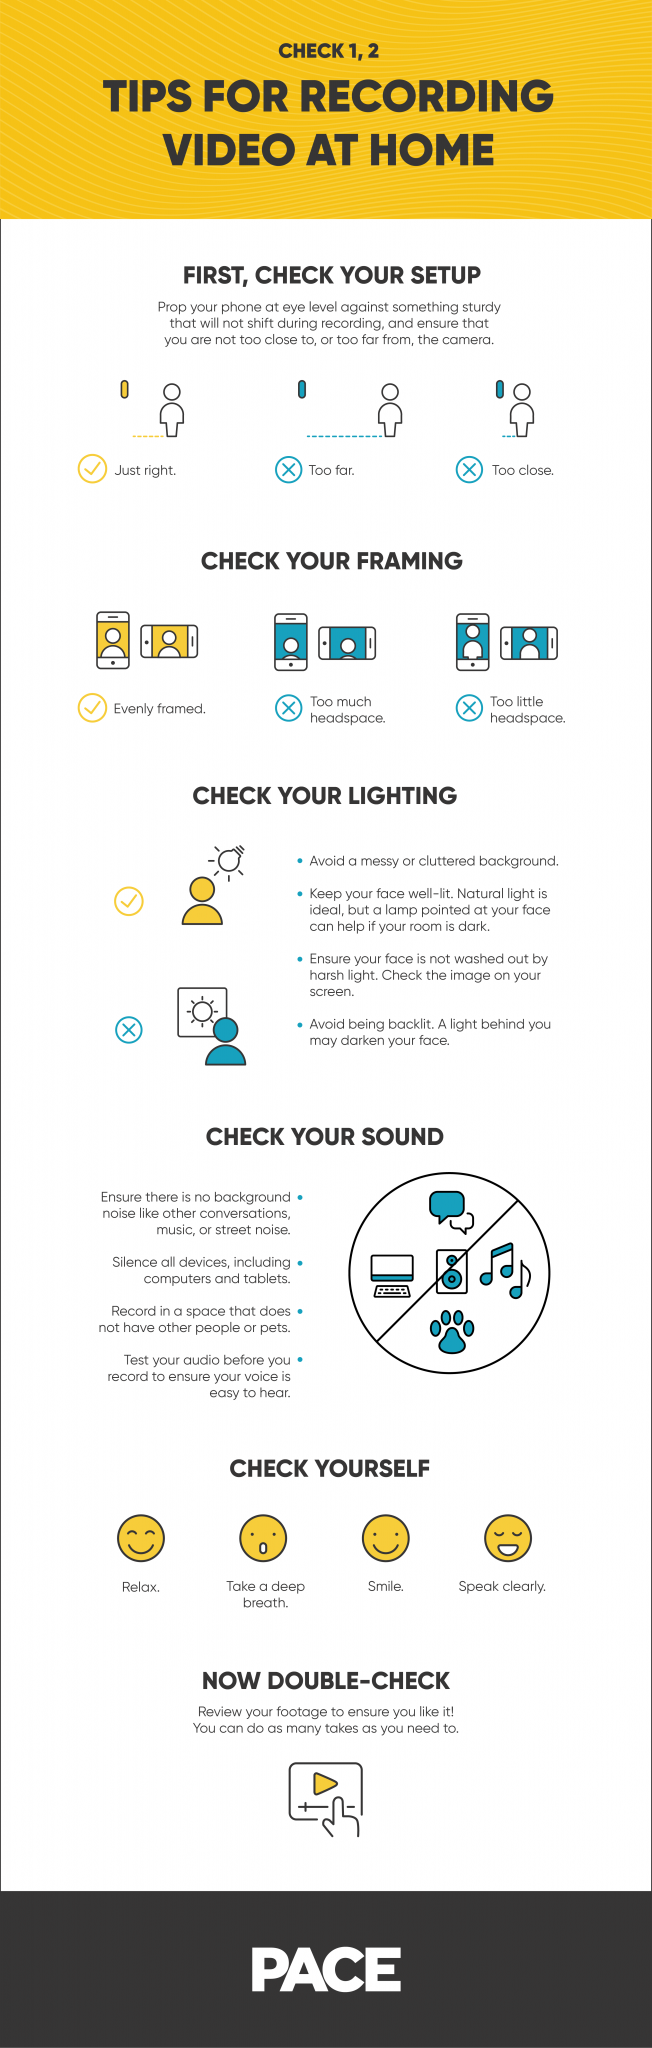
The most important part of a successful smartphone or computer video recording is the setup. If you want to look put good on camera, you’ll want to place your smartphone or laptop’s camera at eye level to mimic how you would have a conversation in real life. Ensure that your device is sturdy and that it won’t shift during recording. A distance of 2 to 3 feet from your device is ideal.
Check your framing
“You want to make sure that your entire face is visible on the screen,” says Pace Senior Director Jon Walls, “and that you are centered, horizontally and vertically.” Camera framing with too little headspace might cut off your forehead (not a good look), and too much can give the impression of a floating head. You’ll know you’ve hit the right spot when you appear to have a few inches of space above your head and you can see some of your shoulders.
Check your lighting
Pace Vice President of Production Brian Bowen gives lighting all the credit for a good video. “When you have good lighting, you can make anything look good,” he says. “Shoot your video during the day if possible, as natural light is the best.”
If you can’t record during the day, you can replicate our studio lighting approach by placing a lamp behind your device, pointed at your face. However, you want to be careful that your light is not too bright or too harsh, as it will wash out your face.
Another lighting tip for video: Avoid being backlit. A light behind you will darken your face so it’s hard for viewers to see your features.
Check your sound
Recording video at home creates new challenges for sound quality. Do your best to limit background noise like dogs barking, kids squealing and street racket. Choose a quiet room and close doors and windows to keep disruptions to a minimum.
Also, be sure to turn on the “Do Not Disturb” setting on the device you are recording with so no alerts ding in the middle of your video. Silence other electronics that may be in your pocket or on your desk.
Check yourself
Now that your space is set up, prepare yourself for success. Studies show that breathing exercises relieve tension and stress to help you relax. So take three deep breaths: Inhale for four seconds, hold for four seconds, exhale for four seconds, and hold for four seconds. Repeat this cycle three times.
In your calmed state of mind, smile and begin your recording. Remember to look at the camera, not yourself—you want viewers to feel like you are making eye contact with them.
There is no rush. Take your time and speak clearly.
DOUBLE-CHECK
Play your recording back and see how you like it. You can re-record as many times as you’d like, but don’t delete those first takes just yet—oftentimes the first take is the best. Finesse your presentation as much as you’d like, but remember that the goal is to have honest and authentic communication with your viewers.
TLDR
Now you’re a pro at content creation in a crisis. Stay-at-home is changing how we do things, but we hope that these tips help your video recording at home feel a little more manageable. Just remember:
- Check your setup: Set your camera on a steady surface about 2 feet from you.
- Check your framing: Evenly space your face in the frame and keep things at eye level.
- Check your lighting: Natural light is ideal. Avoid harsh light and backlighting.
- Check your sound: Minimize background noise and silence your devices.
- Check yourself: Take a few intentional, deep breaths and speak clearly.
- Double-check: Review your footage. Do as many takes as you’d like.